Installation Methods of Different Wall Panels: Your Ultimate Guide
Wall panels have become a go-to choice for homeowners, designers, and contractors seeking a blend of beauty, durability, and practicality. From wpc wall panel installation to plastic wall panels installation, the methods vary depending on the panel type and application. This comprehensive guide explores the installation methods of different wall panels, diving into specific techniques for WPC Great Wall Board, WPC Exterior Cladding Panels, WPC Ceiling, UV Marble Board, Bamboo Board, and PU Stone. Drawing from industry leaders like Woocan Company (woocanwood.com), we’ll cover everything from preparation to finishing touches, ensuring you master panels installation for stunning results. Whether you’re curious about how to apply wall cladding or the benefits of wood stick on panels, this article has you covered.
1. Why Choose Wall Panels for Your Next Project?
Wall panels are transforming spaces worldwide, offering a modern alternative to traditional wall coverings like paint or tiles. Their appeal lies in their versatility, ease of installation wall panels, and ability to elevate both interiors and exteriors. Unlike wallpaper that peels or paint that fades, panels like Woocan Company’s WPC range provide lasting durability with minimal upkeep. From woven wall panels adding texture to UV Marble Boards exuding luxury, these materials cater to diverse tastes and needs.
The installation for wall process is often faster than laying bricks or applying plaster, saving time and labor costs. Panels also offer practical benefits—think moisture resistance for bathrooms or soundproofing for offices. International buyers, in particular, value their adaptability across residential, commercial, and outdoor settings. Whether you’re installing wood wall installation or plastic wall covering for painting, wall panels deliver a unique combination of style and function that’s hard to beat.
2. Exploring Types and Applications of Wall Panels
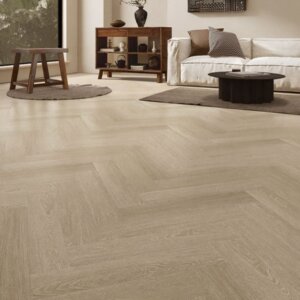
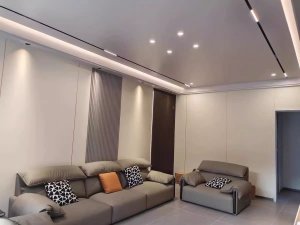
Wall panels come in various forms, each suited to specific environments and design goals. WPC Great Wall Boards, for instance, blend wood and plastic for a sturdy, stylish finish ideal for humid areas. WPC Exterior Cladding Panels excel outdoors, protecting facades from weather extremes. WPC Ceiling panels bring lightweight elegance to overhead spaces, while UV Marble Boards offer a marble-like sheen for upscale interiors. Bamboo Boards appeal to eco-conscious users with their natural charm, and PU Stone panels mimic real stone without the heft.
Applications range from homes and offices to gardens and commercial lobbies. Woocan Company’s products, like their wpc wall panels installation range, are celebrated for their adaptability and quality, serving industries from hospitality to retail. Understanding these types helps buyers choose the right panel and installation wall panels method for their project.
3. Step-by-Step Installation Methods for Specific Wall Panels
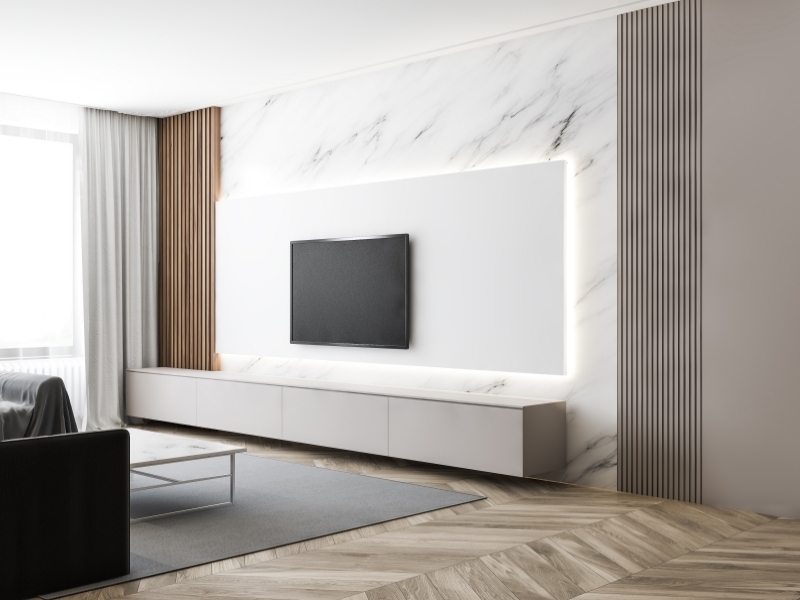
WPC Wall Panels Installation
WPC (Wood Plastic Composite) Wall Panels are durable and stylish for interior walls.
- Measure the Wall Area
- Use a tape measure to determine the height and width of the wall. Calculate the number of panels needed, accounting for doors and windows.
- Tip: Purchase 10% extra panels for cutting errors or future repairs.
- Prepare the Wall Surface
- Clean the wall to remove dust, grease, or old wallpaper. Ensure it’s dry and smooth.
- Reminder: For uneven walls, apply a leveling compound or install a backing board.
- Cut the Panels to Size
- Mark cutting lines with a pencil and use a fine-toothed saw to cut the panels.
- Avoid This Mistake: Leave a 1/8-inch expansion gap around edges to prevent buckling in humid conditions.
- Apply Adhesive (Optional)
- Spread construction adhesive on the back of the panel in a zigzag pattern for extra hold.
- Tip: Confirm the adhesive type with the manufacturer’s recommendations.
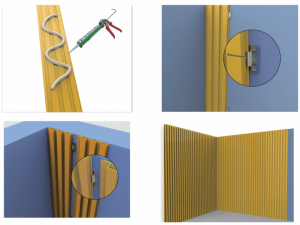
- Secure the Panels
- Start at the bottom, align the first panel with a level, and fasten it with finishing nails or screws every 12-16 inches.
- Reminder: Avoid over-driving nails to prevent surface damage.
- Install Remaining Panels
- Continue placing panels, interlocking them if designed that way, and checking for levelness.
- Avoid This Mistake: Don’t force panels together—misalignment can cause gaps or warping.
- Add Finishing Trim
- Attach corner trims or molding to cover gaps and enhance the look.
- Tip: Match trim color to panels for a seamless finish.
Key Reminder: Acclimate panels to the room’s temperature and humidity for 48 hours before installation to avoid warping.
WPC Exterior Wall Cladding Installation
WPC Exterior Wall Cladding is weather-resistant and ideal for outdoor use.
- Prepare the Wall Surface
- Remove debris and loose paint from the wall. Ensure it’s dry and structurally sound.
- Reminder: Apply a waterproof membrane on masonry walls to block moisture.
- Install a Framework or Battens
- Secure horizontal or vertical battens (wood or metal) to the wall, spaced 12-16 inches apart, using a level.
- Tip: Battens improve ventilation and reduce moisture buildup.
- Cut the Cladding to Size
- Measure and cut panels with a circular saw equipped with a fine-toothed blade.
- Avoid This Mistake: Leave a 1/4-inch gap at ends for thermal expansion.
- Attach the Cladding
- Begin at the bottom, securing the first panel to battens with stainless steel screws or clips.
- Reminder: Use rust-resistant fasteners for outdoor durability.
- Install Subsequent Panels
- Overlap or interlock panels, ensuring levelness and secure attachment.
- Tip: Check alignment every few panels to maintain a straight line.
- Seal Joints and Edges
- Apply weatherproof sealant to joints and edges to prevent water entry.
- Avoid This Mistake: Skipping sealant in wet climates can lead to damage.
Key Reminder: Ensure proper airflow behind cladding to prevent mold and extend material life.
WPC Ceiling Installation
WPC Ceiling panels are lightweight and simple to install.
- Measure the Ceiling Area
- Measure the length and width to determine panel quantity and layout.
- Tip: Plan cuts to achieve a balanced, symmetrical appearance.
- Install a Framework or Furring Strips
- Attach furring strips or a metal grid to ceiling joists, spaced 16-24 inches apart, using a level.
- Reminder: An even framework ensures a flat ceiling.
- Cut the Panels to Fit
- Cut panels with a fine-toothed saw; use a jigsaw for fixtures or vents.
- Avoid This Mistake: Include expansion gaps around the perimeter.
- Secure the Panels
- Start in one corner, fasten the first panel to the framework with screws or clips, and verify alignment.
- Tip: Mark a chalk line for a straight starting point.
- Install Remaining Panels
- Interlock panels as needed, checking levelness regularly.
- Reminder: Work in sections for large ceilings to maintain accuracy.
- Add Trim and Finishing Touches
- Install ceiling trim to cover gaps and refine edges.
- Tip: Flexible trim works well for irregular ceilings.

Key Reminder: Ventilate the room during installation to disperse any cutting odors.
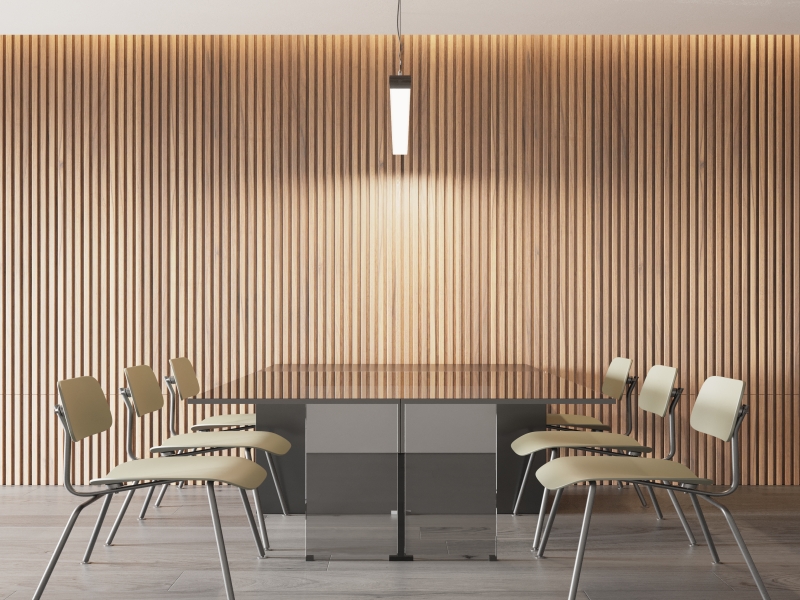
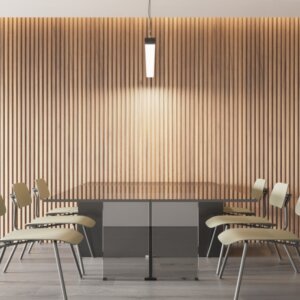
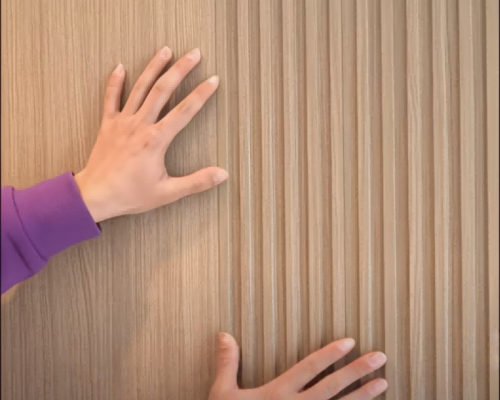
Wooden Acoustic Slats Wall Panel Installation
Wooden Acoustic Slats enhance soundproofing and aesthetics.
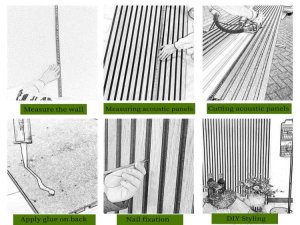
- Measure the Wall
- Measure the wall and plan slat spacing (typically 1-2 inches) for acoustic benefits.
- Tip: Consistent spacing optimizes sound absorption.
- Prepare the Wall Surface
- Clean and smooth the wall; add a backing board if needed for insulation.
- Reminder: Sound-absorbing material behind slats boosts performance.
- Cut the Slats to Size
- Use a miter saw to cut slats, sanding edges for smoothness.
- Avoid This Mistake: Measure each slat individually to fit wall variations.
- Apply Adhesive or Mounting Hardware
- Apply adhesive evenly or use clips/screws as specified by the manufacturer.
- Tip: Use a notched trowel for uniform adhesive application.
- Install the Slats
- Begin at the bottom or side, leveling the first slat and using spacers for even gaps.
- Reminder: Follow spacing guidelines for best acoustics.
- Finish with Trim (Optional)
- Add trim to edges for a polished look if slats don’t cover the full wall.
- Tip: Match trim finish to slats for unity.
Key Reminder: Avoid excess adhesive or overtightening screws to preserve slat shape and sound quality.
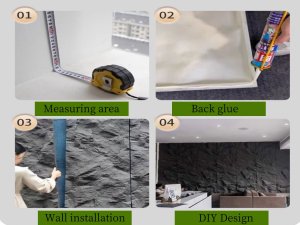
UV Marble Board Installation
UV Marble Boards mimic marble with easy installation.
- Prepare the Wall Surface
- Clean the wall and remove dust or grease; sand rough areas.
- Reminder: Prime the wall for better adhesive grip.
- Measure and Cut the Boards
- Measure and cut boards with a utility knife or fine-toothed saw.
- Tip: Clamp a straight edge for accurate cuts around outlets.
- Apply Adhesive
- Spread adhesive in a grid pattern on the board’s back.
- Avoid This Mistake: Excess adhesive can seep out and ruin the finish.
- Press the Boards onto the Wall
- Start at the bottom, press firmly, and level the board.
- Tip: Roll over the surface to remove air bubbles.
- Secure with Screws (Optional)
- Add screws in corners for uneven walls, covering with plugs.
- Reminder: Pre-drill to avoid cracking.
- Seal the Edges
- Apply silicone sealant along edges to block moisture.
- Tip: Match sealant color to the board.
Key Reminder: Wear gloves to prevent scratches on the glossy surface.
Bamboo Charcoal Wall Panel Installation
Bamboo Charcoal Panels are eco-friendly and purify air.
- Acclimate the Panels
- Let panels adjust to room conditions for 48 hours.
- Reminder: Skipping this risks warping post-installation.
- Prepare the Wall
- Clean and dry the wall; remove old adhesive or wallpaper.
- Tip: Seal porous walls to limit moisture uptake.
- Measure and Cut the Panels
- Cut panels with a fine-toothed saw or utility knife.
- Avoid This Mistake: Leave expansion gaps, not tight fits.
- Apply Adhesive or Use Clips
- Apply adhesive in a zigzag pattern or use clips per instructions.
- Tip: Ensure even adhesive coverage.
- Install the Panels
- Start in a corner, aligning and leveling each panel.
- Reminder: Check level often on large walls.
- Finish with Trim
- Add trim to cover gaps and enhance appearance.
- Tip: Choose natural-toned trim to complement panels.
Key Reminder: Avoid high-humidity areas unless sealed, as moisture affects bamboo.
PU Stone Installation
PU Stone panels offer a lightweight stone aesthetic.
- Prepare the Wall Surface
- Clean and level the wall; add a waterproof membrane for exterior use.
- Reminder: Use a backing board for uneven surfaces.
- Measure and Cut the Panels
- Measure and cut with a handsaw or jigsaw for curves.
- Tip: Arrange cuts for a natural stone pattern.
- Apply Adhesive
- Use polyurethane adhesive in a grid pattern on the panel’s back.
- Avoid This Mistake: Insufficient adhesive weakens outdoor bonds.
- Press the Panels onto the Wall
- Press firmly from the bottom up, leveling each panel.
- Tip: Use a helper for large panels until adhesive sets.
- Secure with Screws (Optional)
- Add screws discreetly for exterior strength.
- Reminder: Use rust-resistant screws.
- Seal the Joints
- Apply flexible sealant to joints for weatherproofing.
- Tip: Blend sealant color with stone tones.
Key Reminder: Handle PU Stone gently to avoid dents or scratches.
Final Tips for All Installations
- Safety: Wear gloves, safety glasses, and a dust mask when cutting.
- Accuracy: Measure twice to minimize waste.
- Manufacturer Guidance: Always check product-specific instructions.
- Expansion Gaps: Leave space for material movement.
- Cleanup: Remove excess adhesive or sealant immediately.
With these steps and tips, you’ll achieve a professional installation for any of these products.
4. WPC Wall Panels Installation vs. Traditional Panels: What’s Different?
WPC wall panels streamline installation compared to traditional options like wood or plasterboard. Wpc wall panels installation often uses clips or adhesives, cutting down on time and tools versus the sanding and priming needed for conventional panels. WPC’s lightweight nature simplifies handling, and interlocking designs reduce reliance on paneling joint strips. Traditional wood wall installation, by contrast, may demand heavy-duty saws and extensive prep.
Woocan Company’s how to install WPC wall panels guides highlight this efficiency, appealing to DIYers and pros alike. Traditional panels might offer a classic feel, but WPC’s modern approach wins for speed and ease, especially in large-scale projects.
5. Wall Panels vs. Other Wall Decorations: Pros and Cons
Advantages
- Efficiency: Panels installation beats the multi-step process of tiling or painting.
- Longevity: WPC and PU Stone resist wear better than wallpaper.
- Design Variety: From woven wall panels to plastic wall covering for painting, options abound.
- Ease of Care: Wipe down instead of repainting.
Disadvantages
- Cost: Premium panels outprice basic paint initially.
- Precision Needed: Misaligned installation wall panels can ruin the look.
- Less Flexibility: Harder to swap than a fresh coat of paint.
Wall panels shine for durability and style, though they require careful wpc wall panel installation planning.
6. Behind the Scenes: Wall Panel Production Insights
WPC panels mix wood fibers and plastic, extruded into durable sheets. UV Marble Boards layer PVC with a glossy UV coat, while Bamboo Boards press sustainable stalks into panels. PU Stone molds polyurethane into lightweight stone replicas. Woocan Company’s processes prioritize quality and sustainability, influencing installation for wall outcomes. Buyers benefit from knowing these methods to select panels matching their project’s needs.
7. Questions Buyers Should Ask Suppliers Like Woocan Company
- How do you ensure quality for wpc wall panels installation?
Yes, we can know the installation throughout the process, and there is a professional technical team to serve you.
- Can you provide custom how to install WPC wall panels guides?
Yes, our designers will provide detailed instructions.
- Are materials eco-friendly?
Yes, we can provide a test certificate.
- Do you support wall framing panelling queries?
Yes.
These ensure buyers get reliable products and installation wall panels support.
8. Wrap-Up: Perfecting Your Wall Panel Installation
Mastering panels installation—from wpc wall panel installation to plastic wall panels installation—unlocks endless design potential. With Woocan Company’s innovative solutions at woocanwood.com, you’re equipped for success across any project.